Posture can be improved to alleviate chronic pain

Fix Your Posture To Alleviate Chronic Pain

Correcting bad posture habits

We all are guilty of slouching when we sit, walk and even stand which promote bad posture. However, most of us aren’t even aware we are doing this. Most of us lack self-awareness of how we move throughout our day. Poor posture has been linked to back pain as a main cause. Breaking bad posture habits requires us to check in with ourselves and observe what proper posture looks and feels like.

Having good posture always looks better and it also affects both our health and our state of mind. Let’s look at some proper postures:

Proper Standing Posture:

We can do this by observing ourselves in a mirror. Good posture means we pull our head back and our shoulders down and back. You should feel as if you’re sticking out your chest if you’re standing correctly.

Proper Sitting Posture:

We can also practice sitting all the way back in our chairs. By doing so we should be able to keep our feet flat centering our weight over our buttocks and pubic bone. This will ensure we’re in the proper alignment. If we’re in a car or sitting against a soft service using a lumbar support pillow under our lower back helps alleviate discomfort.

Proper Lifting Posture:

Paying attention to how we lift is also important. We should always practice lifting with our legs by squatting to get our bodies under the weight rather than hinging from the waist. We never want to pick-up something by rounding our backs. Our shoulders should always remain back and chest out.

We should also get out of the habit of carrying heavy loads on our backs as this creates a lot of added strain. The best method for transporting a load is by using a cross-body bag or a backpack to help distribute the weight more evenly.

High heels are another culprit for poor posture. They cause the entire weight of the body to shift forward towards the ball of the foot putting strain on the back and knees. We should opt for wedges and low heels under 2 inches instead.

Proper Sleeping Posture:

Sleep posture is an important factor to consider when improving bad posture habits. When we sleep on our side we should always put a pillow between our knees to stay in alignment. If you’re a back sleeper placing a pillow under the knees can help open up the joint spaces in the spine. We should try to avoid sleeping on our stomachs as this puts a strain on the neck and move towards a healthy sleeping position.

Effects on the body - How bad posture hurts your body

Bad posture doesn’t only affect your back. It can also:

  • lead to knee, hip, shoulder, pelvic and neck pain and arthritis
  • can hinder digestion and even cause headaches
  • disrupt your ability to concentrate and move efficiently
  • can interfere with your quality of sleep and even quality of life

Many people spend hundreds of dollars on chiropractors and massages to help reduce the persistent pain they feel from poor posture. However, this remedy is only a temporary fix. Until we take a proactive approach to correct our posture and practice good sitting, standing and lifting habits we will continue to suffer the repercussions of bad posture.

Identifying bad posture

Good posture can feel exaggerated or unnatural especially if you’re used to slouching. In order to identify whether your posture is good or bad, here are a few things you may want to try:

Correcting Standing Posture:

When you’re standing your body should be in alignment by keeping your head in a neutral position and your ears lined up with the middle of your shoulders. Both your upper and lower back should be upright. Many people with a weak core stand with their pelvis tilted forward. You should always keep your hips tucked under you minimizing the curve in your lower back. The illustration below from the Comprehensive Spine Institute best depicts what good and bad standing posture should look like.


Correcting Sitting Posture:

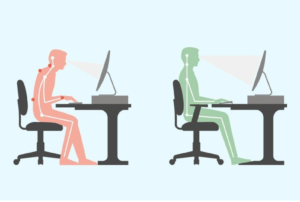
On average people spend 10 hours a day sitting, which is also taking a toll on our posture. The first thing you need to check is your computer, desk or work station. If your desk is not at the right eye level of the computer screen and your keyboard is not positioned the right distance from your chair you will slouch your shoulders jetting your neck forward, which is a sign of bad back posture. Check that your feet are resting flat on the floor and that your legs are not crossed. This ensures your weight is evenly distributed across both hips and feet. The illustration below is a good visual of the difference between good and bad sitting posture.
 
We can also use the wall test to help us identify bad posture. Start by standing with your head, shoulder blades and buttocks against the wall with your heels 2 to 4 inches from the wall. Bring your palms up by your ears so that your fingertips also touch the wall. Have someone place their palm behind your lower back against the wall. There should be just enough room for them to slide their hand between your lower back and wall. When there is too much space draw your belly button in towards your spine. If there is not enough space arch your back just enough for the hand to fit. In the event you don’t have someone to help you, practice using your own hand.
 
These simple tips can help you in identifying how to improve posture.

Exercises to improve posture

Now that you are aware of your bad posture there are some basic posture correction exercises you can do regularly to help correct it.

Back And Shoulder Exercises:

  1. The shoulder blade squeeze involves sitting upright in a chair with your hands resting on your thighs. Keeping your shoulders down slowly draw your shoulders back and squeeze your shoulder blades together. Hold here for a count of 5 and repeat several times. You can also try this exercise while lying flat on your stomach with your arms by your side and your thumbs pointed up towards the ceiling. All you have to do is practice drawing your shoulder blades together without lifting your head or feet off the ground.

  2. Wall angels are another exercise we do with our clients to help reverse bad posture. To do this stand with your back against the wall and your feet 2 to 4 inches from the wall. Bring your arms up by your ears so your elbows are bent and rest your palms, head, buttocks and shoulders against the wall. From here you can practice the shoulder squeeze exercise and then try straightening your elbows to raise your arms up over head forming the letter Y. Repeat this exercise 10 times for 2-3 sets.

  3. Using a resistance band you can also stand with your feet staggered with one foot in front. Place the band underneath your front foot and while holding the handles lift the resistance band upwards away from your body keeping your arms straight. Keep a slight bend in your elbows and hold here at shoulder height for a few seconds before repeating. Be sure to keep your shoulders down and back straight while doing this exercise. This is called the V-move.

Chest Exercises:

  1. To loosen your tight chest muscles, which often become restricted with bad posture try the doorway stretch. While standing in a doorway bend one elbow and lift your arm so that your elbow and shoulder are aligned. Place your hand at the edge of the doorway or on the corner of the wall and slowly lean into your raised arm so that your chest moves forward past the wall and hold for about 10 seconds. Repeat this several times on each side.

Hip Flexor Exercise:

  1. Tight hip flexors can also affect your posture. To stretch them start by kneeling on the floor with one foot planted and the opposite knee down. Place both hands on the right thigh and lean forward to feel a stretch in the hip flexors. You can also advance this stretch by bringing both palms on the inside of the front leg so that they are resting on the floor. The goal here is to get your shoulders in alignment with your front knee. Hold for 10 seconds and repeat several times on each side.

There are many yoga poses for correcting bad posture by stretching and training the back muscles to engage properly. Keeping your core strong and hips open also plays a part both of which yoga helps with.

Best meal delivery service options

Meal delivery gaining in popularity

Meal delivery services have quickly saturated the market as a healthier way to eat if: you aren’t someone who likes to cook, if you generally dine out or don’t have much time to prepare meals. Convenience has become a staple in our society and that includes the way we eat. Most people are aware that eating out all the time gets expensive and it also becomes impossible to track how well you’re eating. This is because there is no way to know how your food is prepared and the ingredients that are being used. Meal delivery services help give you control over what you are eating by allowing you to choose your meal options and see the ingredients used.

Choosing the best meal delivery service for you

There are a lot of meal delivery companies now competing for your purchase. Too many options can lead to a lot of confusion and uncertainty. Let me decipher what key items you should be looking for when making your selection.

Macro-friendly

First, you want to make sure the meals are macro-friendly meaning there is a good balance of fats, carbs, and protein. A higher protein rich meal will keep you fuller longer and it will help you avoid the water bloat from too many carbs. Protein is essential to your body’s repair of muscle tissue and every cell in the body.

Portion Size

Portion size is also important. Some meal prep services offer you tiny servings that will leave you still hungry, but if you thrive on eating smaller more frequent meals throughout the day smaller portions might be the way to go!

Prep time and Ingredients

You may also want to consider how many ingredients are involved with each meal and the amount of prep time. If your goal is to save time you may be less drawn to companies like Blue Apron and HelloFresh. Instead you may be interested in Gobble, Dinnerly and EveryPlate who are in the fewer-ingredients-and-less-prep arena. GoReadyMade and Epicured are other meal options that involve no prep work at all. All you have to do is heat them up and they are ready to eat!

What’s going to appeal the most to your palette? If you are someone who enjoys worldly flavors, EveryPlate or TakeOut Kit might be more in your ballpark but, if you are a picky-eater you’re better off with trying a company like Dinnerly.

Dietary Restrictions

Certainly if you have any food restrictions you want to look at companies like Sun Basket or Green Chef because they offer menus to suit all of your dietary needs. Purple Carrot is another option that appeals to vegan lovers.

Pay attention to the reviews because the most well-known brands aren’t necessarily the most well-received. Home Chef, which is owned by Kroger, has one of the highest customer satisfaction ratings out of all the top-rated home delivery services.

Prices

Price comparison is important to consider when choosing the right delivery service for you. From what we’ve seen prices can range from $4.99 per serving plus shipping to $12.00+ per serving plus shipping. Below are the cheapest meal delivery service options ranked in order from lowest to highest. Click the link above for coupons you can use to try them all.

Service

Price Per Serving

EveryPlate

$4.99 ($8.99 shipping)

Dinnerly

$5.75 – 6.50 ($8.99 shipping)

TakeOut Kit

~$7.75 (free shipping)

HelloFresh

$7.49 – $8.99 ($6.99 shipping)

Blue Apron

$7.49 – $9.99 (free shipping)

Marley Spoon

$8.99 – $12.99 (free shipping)

Freshly

$8.99 – $12.99 (free shipping)

Home Chef

$9.95 (free shipping on orders $45+)

Plated

$9.95-$11.95 (free shipping on orders $60+)

Sun Basket

$10.99-$11.99 ($6.99 shipping)

Green Chef

$10.99-$12.99 ($5.99 shipping)

Purple Carrot

$12.00 (free shipping

Meal delivery services cut back on spending and waste

Initially, you might see signing up for a meal delivery service as an added expense but, when you think of cost per meal it’s much cheaper than dining out or even ordering in from seamless. 

Even if you grocery shop and prepare your own meals, portioned meals reduce more waste and the number of groceries you end up purchasing. Rather than having to purchase an entire bushel of broccoli to make one recipe that only calls for a few stalks you receive the exact portion you need so none goes to waste. Fresh produce doesn’t hold up well for very long so if you buy more than you need for one sitting from the grocery store chances are a lot of it ends up in the trash.

Meal deliveries offer something for everyone

There are enough companies now offering home meal deliveries so there is at least one that appeals to everyone. Most are customizable to suit your needs. They offer fast-track service to guarantee you have a healthy meal whenever you need it. Unlike seamless, many of these companies even offer environmentally friendly packaging that is either recyclable or biodegradeable so you don’t have to discard harmful plastics.

You can save time and still eat to your own healthy standards instead of relying on fast food. You can do this while helping the environment. By creating healthier dietary habits you’re better able to manage your weight and overall health. Sounds like a win win if you ask me!

Waist trainers pose dangers

Is waist training right for you?

Is waist training safe? Do waist trainers work? Does waist training flatten your stomach? Are waist trainers effective? These are some common questions that comes to mind when you are considering using waist trainers. This article is a quick bible to answer those questions for you, so let’s jump right in.

Long-term waist training, also known as waist cinching, may alter your waist line temporarily, but it poses serious health risks. It’s easy to get fixated on the altered appearance that celebrity proponents showcase using waist trainers. However, what they don’t reveal is that they are pushing their organs into unnatural positions altering their ability to function well.

Dangers of waist trainers

Wearing the corset long-term can pose other risks to your health. It can:

  • cause damage to your ribs and even deprive your body of oxygen reducing lung capacity by an estimated 30-60%.
  • cause you to pass-out and even lead to build-up of fluid in your lungs as well as inflammation.
  • affect your digestive system because of the compression leading to blockages in your digestive tract and acid reflux.
  • restrict your lymphatic system, which would hinder your body’s ability to dispel wastes and toxins. 
  • lead to thigh pain, tingling or numbness, which may be a sign of meralgia paresthetica.
  • can also lead to rash and infection as tight synthetic materials trap moisture.

    These negative consequences and side effects of waist trainers largely outweigh any potential benefits from their long-term use.

Disproving the benefits of waist trainers

The  use of waist trainers is another get-thin quick scheme. There is no evidence to support the theory that wearing a corset causes weight loss. Even waist training advocate Jessica Alba admits that she got her post-baby body back with the help of “a healthy diet, exercise and drinking lots of water.” It all comes down to lifestyle. Wearing a waist trainer is an ineffective way to lose inches and it won’t actually change your body proportions. The only way to alter the structure of your bones you were born with is through surgery. If you look at the fittest people you know including celebrities like Cameron Diaz, Jennifer Lopez and Nicole Kidman you’ll see even at our healthiest we are all shaped differently. We are not all born with hour-glass figures and that shouldn’t be our depiction of beauty. A healthy body is a beautiful body.

Effective ways to reshape your waistline

If your goal is to have a slimmer waist you have to first address your diet. The easiest way to do this is to make sure you’re eating macro-friendly meals. This means you should be incorporating enough protein into your diet. Your carbohydrate and fat intake should be measured based on what a healthy caloric deficit looks like for you. We have information here on our website, which goes into greater detail about how to effectively practice flexible dieting. This is a service we also offer to all of our clients at no additional cost.

Exercise is another important factor in waist training. You should always focus on targeting your entire body in your workouts because spot training is not a thing. You can not control where your body is going to lose weight first. Abdominal exercises should be included in your workout program. Some of our favorite ab exercises for creating a similar waistline are:

1. Side planks: This exercise targets the obliques and transverse. The transverse abdominis are the deeper core muscles you do not see that wrap around your torso from front to back like a corset. These muscles are important for keeping your core tight and flat and controlling posture and movement. Focus on holding this position for 30 seconds and work your way up to a minute.

2. Leg raises: This exercise targets the rectus abdominis. You want to lie flat on your back with your legs resting out straight in front of you. Slowly inhale from your diaphragm and on the exhale you raise your legs up towards the ceiling. If you have a weaker core you may feel this in your back.  To avoid this place your hands together under the base of your spine for added support. Try for 15 reps.

3. Bicycle crunches: This exercise targets your entire abdominal region. Focus on lying on your back with your hands behind your head and alternate touching opposite knee to opposite elbow. Your legs should stay elevated in the air during this movement. Try for 30 reps on each leg.

Waist training: Exercises for building curves

You can build more curves by targeting your glutes and outer thigh muscles giving you more of that hour glass appearance.

Some of our favorite exercises for waist training are:

1. Glute hip thrusts: This targets your butt and core. Start lying on your back with your knees bent and hips elevated. Hold for 5-10 seconds and then lower and repeat. For more resistance you can elevate your feet onto a bench and add dumbbells, a resistance band or a weighted bar to your thighs. You can also try this on a single leg.

2. Hip abductions: This targets your outer thighs and glutes. You can do this on an assisted machine or by doing clamshell. For this exercise start lying on your side with your head flat and knees stacked. Slowly lift the top knee towards the ceiling while keeping your feet together targeting the top extensor. For added resistance you can put a resistance band around your legs or rest a weight on the top outer thigh as you lift. Try performing 15 reps on each leg.

3. Bulgarian split squat: This activates the quads as well as the glutes. Start with a staggered stance with your back foot elevated on a bench or step. Lower yourself into a lunge bending both knees and driving your back knee as close to the floor as you can. Come back to a standing position and repeat. Try this for 15 reps on each leg .For added resistance you can add weight.

4. Goblet squat: This targets your inner thigh, glutes and quads. For this exercise start with your feet wider than shoulder width apart and toes pointed out away from the body. Keeping your hips under you slowly lower your butt towards the floor bending both knees. For added resistance hold a dumbbell at your chest or down between your legs. Try repeating this exericse for 15 reps.